Medium. You must know a typical sum about this device/subject
~twenty minutes
Setting up an e-commerce or membership website?
Then you almost certainly know how essential it is to have smooth consumer navigation.
When a consumer visits your website, you want to make confident that all the vital backlinks are simply available, this kind of as the registration, login, and logout pages.
In this manual, I’ll demonstrate you how to make these backlinks available in Breakdance primarily based on the user’s position and login standing. We’ll also develop a customized account web page to increase the consumer expertise.
Here’s what you can accomplish by the finish of this tutorial:

- Setting Up the Plugin and Style Template
- Generating a Breakdance Header Template
- Including a Breakdance Consumer Registration Type
- Including a Breakdance Consumer Login Type
- Including Customized Logout Pages
- Including Backlinks to the Header
- See Account Web page Soon after Login
- Ultimate Output
- Wrapping It Up
Setting Up the Plugin and Style Template
one) Set up LoginWP
LoginWP, formerly acknowledged as Peter’s Login Redirect, lets you set up customized redirects following a consumer logs in, logs out, or registers, primarily based on their position.
For illustration, if you’d rather not show WordPress’s default login kind following a consumer logs out, you can redirect them to a customized logout web page of your option.
To set up LoginWP, go to Plugins > Include New in your WordPress dashboard. In the search bar, variety ‘LoginWP.’
After you discover the plugin, click ‘Install’ and then ‘Activate.’

Soon after activation, you must see ‘LoginWP’ displayed on the left navigation bar of your dashboard.
two) Pick a Breakdance Template
Up coming, let’s use a single of Breakdance’s design and style templates. Undertaking so will conserve you time in developing your pages.
Just go to Breakdance > Style Library and import a template that you adore. In this manual, I’ve picked the ‘Tiny Clothes’ template.

Generating a Breakdance Header Template
one) Edit the Header Template
Each and every design and style template in Breakdance comes with its personal header. Nevertheless, in this tutorial, we aim to customize our header a bit far more. We’ll include backlinks for signing up, logging in, and logging out. Plus, for that personalized touch, we’ll show the user’s identify when they are logged in.

Very first, head more than to Breakdance > Headers. Right here, you must see the template’s default header named ‘Main Header.’ You can open this in the Breakdance editor and edit it. Or, you can also develop your personal header by clicking the ‘Add Header’ button.

Tip: When generating a new header, make confident to set its priority variety increased to override the other present headers.
After you are within the Breakdance editor, include the essential text factors for the login, logout, registration, and consumer identify.
two) Include Dynamic Information
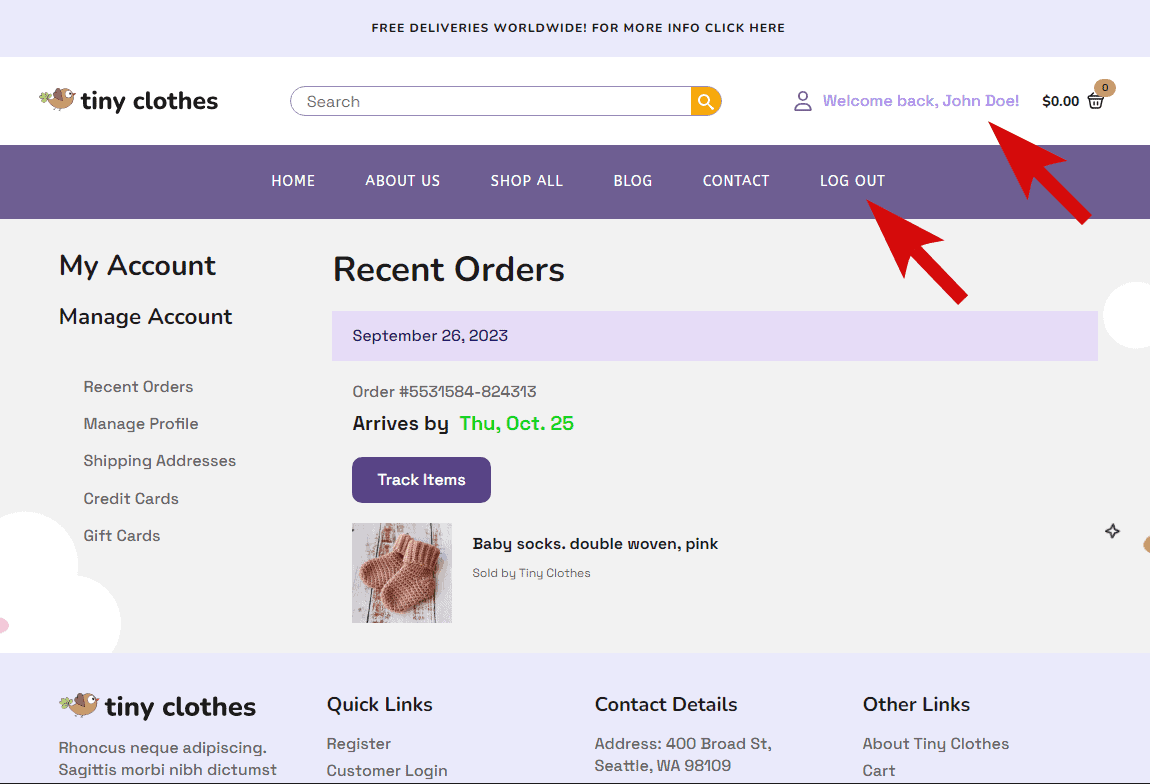
We want our header to greet our end users with a ‘Welcome back, [user name]’ when they are logged in.
To accomplish this customized touch, we’ll include dynamic information to our text.
Begin by clicking on the text component in which you want the user’s identify to seem.
On the left sidebar, hover more than the text. You may discover a dynamic icon up coming to it – click on that. A pop-up window will seem.

Then, scroll down to the ‘Current User’ area and click ‘Username’. Considering that you happen to be logged into WordPress, you will instantly see your identify as a preview.

Up coming, click on the innovative selection in the dropdown. Right here, prepend your text with ‘Welcome back, ‘ and append it with an exclamation mark ‘!’ to full the greeting.

three) Include Situations Based mostly On User’s Logged In Standing
Up coming, we want to management when to show the backlinks ‘Sign up,’ ‘Log In,’ and ‘Log Out’ primarily based on no matter whether a consumer is logged in or not. Let us set up these situations.
Begin with the ‘Sign up’ text. Click on it, then go to the settings tab. Right here, you will discover a ‘Conditions’ dropdown. Click on ‘Edit Situations.’

In the pop-up, set the ‘User Logged In Status’ to ‘logged out’. After you click ‘Apply Situations,’ the ‘Sign up’ text will only be noticeable to end users who are not logged in.

Now, let us apply equivalent logic to the other text factors.
For the ‘Log In’ text, I have configured the ‘User Logged In Status’ to ‘logged out’. This indicates it will only be noticeable to end users who are not presently logged into the website.

Conversely, for the ‘Log Out’ text, I have set its ‘User Logged In Status’ to ‘logged in’. This assures that only end users who are logged in will see the selection to log out.

And for our customized greeting, ‘Welcome back, [user name],’ I have set the ‘User Logged In Status’ to ‘logged in’. This way, only logged-in end users will see this warm greeting.
Soon after you have created all these changes, never overlook to click conserve.
Including a Breakdance Consumer Registration Type
Breakdance templates frequently come with a suite of predesigned pages, like a registration kind. This is a excellent beginning stage, but you may want to tweak it to greater suit your demands.
Just go to the ‘Pages’ tab and search for the registration web page. Open it in the Breakdance editor to make any wanted alterations.

But if you desire far more customizations, you can commence fresh with a new web page. Yet again, head more than to ‘Pages’ and click ‘Add New.’ Enter a title, click conserve, and publish. Then, open the web page in the Breakdance editor.
On the left side menu, you will discover the ‘Register Form’ component. Drag and drop it onto your web page.

Now, you can modify the kind to your liking. Alter up the labels, set a customized accomplishment message, and far more.
Will not overlook to include a login button on this web page. This supplies a fast way for present end users to log in. We’ll hyperlink this button to the login web page shortly.
Include design to your web page. Change the layout, font types, colours, and padding. Be innovative.
After your registration web page is prepared, you require to make sure end users can truly register on your website.
Back to your WordPress admin location, go to Settings > Common Settings.
Right here, you will discover the ‘Membership’ area. Tick the box labeled ‘Anyone can register.’

Just under that, there is an selection for ‘New Consumer Default Part.’ This determines the position new end users are assigned when they register. Set this to both ‘Subscriber’ or ‘Customer,’ based on your preference.
With these settings in location, scroll down to the bottom of the web page and click ‘Save Modifications.’
Including a Breakdance Consumer Login Type
Breakdance templates also supply a predesigned login web page, prepared for you to use.
But there is usually space for customization to make it uniquely yours.
If you happen to be articles with the predesigned login web page, you can search for it on the ‘Pages’ tab and make any essential tweaks in the Breakdance editor.

If you desire to commence from scratch, just click ‘Add New’ on the ‘Pages’ area. Include a web page identify, click conserve, and then publish. Open your new web page in the Breakdance editor.
For this tutorial, I have employed the ‘Login Form’ component, which you can simply entry from the left navigation bar. Drag and drop it onto your web page.

Now, modify the labels, set a customized accomplishment message, and modify the submit button text. Nevertheless, hold off on setting the redirect URL for now we’ll come back to it following setting up the user’s account web page.
Up coming, include a button that will ultimately hyperlink to the registration web page. We’ll also revisit this later on to include the appropriate URL.
As usually, give your kind a polished seem by adjusting the layout, font types, colours, and padding.
After you happen to be happy with the seem and truly feel of your login web page, conserve your alterations.
Including Customized Logout Pages
Customized logout pages could be any pages you want.
In this tutorial, I’m going to set the residence web page as the logout web page.
Yet again, you can use the predesigned residence web page from the Breakdance template, or develop your personal customized web page.

Typically, a consumer can log out from a WordPress website by clicking the logout hyperlink on the admin bar. You have almost certainly completed this ahead of – just click your profile image in the leading proper corner and pick ‘Log Out.’

This will then consider you to the WordPress login web page.

But we do not want that except if the consumer is the website administrator. As an alternative, we want to redirect end users to the residence web page on logout. You can accomplish this by including a customized code. Or, utilizing plugins like LoginWP.
Let’s use the plugin to make our lifestyle simpler.
Adhere to these methods to include URL redirects to your WordPress website:
one) From your WordPress dashboard, go to LoginWP > Redirection Guidelines. Click ‘Add New.’

two) Underneath the ‘Rule Situation,’ pick the ‘User Role’ from the dropdown. Then, select ‘Customer’ (or ‘Subscriber’) on the up coming dropdown area.
three) In the ‘Redirect URLs’ area, input the URL of the wanted web page underneath the login URL. This is in which end users will be directed publish-login. For this tutorial, we’re utilizing the user’s account web page.
four) For the logout URL, input the URL of the web page in which you want end users to land following logging out. Right here, we’re utilizing the site’s residence web page.
five) In the ‘After Registration’ area, specify a URL to redirect end users to publish-registration. If your registration kind previously redirects to a distinct web page, you can skip this phase.

six) After all information are in location, click ‘Save Rule’.
Tip: If you are not confident in which to discover the URL of your web page, basically open the web page from your WordPress dashboard. On the proper side, you will discover the page’s URL. Copy it and paste it into the suitable area in the LoginWP settings.

Including Backlinks to the Header
Now that we’ve designed the residence, login, and registration pages, let’s go back to the header template and hyperlink these pages.
Very first, let’s hyperlink the ‘Sign Up’ text to the registration web page. Click the text component and, on the ‘Edit’ tab on the left, include the URL of the registration web page.

Similarly, for the ‘Log In’ text, input the URL of your login web page.

Then, for the ‘Log Out’ text, include the logout hyperlink. Right here, you will require to make confident that the consumer is totally logged out and not just redirected to an additional web page.

Here’s the logout hyperlink I’ve employed:
http://your-domain.com/?buyer-logout=true
Keep in mind to exchange ‘your-domain’ with the real identify of your website.
This hyperlink assures end users are logged out and, thanks to the LoginWP plugin, they will be redirected to the residence web page publish-logout.
One more way is to use WordPress’s default logout URL:
http://your-domain.com/wp-login.php?action=logout
Nevertheless, this hyperlink will consider the consumer to the warning web page, as proven under.
The consumer demands to click ‘log out’ to verify if they really want to log out. It really is a bit far more cumbersome, as it interrupts the consumer expertise with a default WordPress web page.
Last but not least, check your backlinks on the front-finish. After you are happy, click conserve.
See Account Web page Soon after Login
Now, let’s consider to redirect the consumer to their account web page publish-login.
Yet again, the Breakdance template supplies a predesigned account web page. You can modify it as required to align with your site’s aesthetics and performance.
If you have set up WooCommerce, you can also use their default account web page or dashboard. All you require to do is include a shortcode. The only downside of this is that it is not customizable inside of the Breakdance editor.
For this manual, I’ve developed a customized account web page, as proven under.

Although this illustration is static (in contrast to WooCommerce’s dynamic dashboard), it serves our function of focusing on the login and logout performance.
Provided that we have previously set up redirect URLs in the header, there is no require for further URL configurations at this stage.
Soon after conserving, usually preview your web page on the front-finish. This assures that every little thing seems and functions as meant from a user’s viewpoint.
Ultimate Output
This is the ultimate seem of our residence web page.
Let us stroll via the finish-consumer expertise primarily based on the setup we have designed:
Very first, open your WordPress website by launching an incognito window (or use a various browser). Then, click ‘Log In.’
Assuming the consumer is not registered however, let’s click the register button. Fill in the necessary information: username, e mail tackle, and password. Soon after clicking ‘Register,’ a accomplishment message must verify the registration.

To make confident the registration approach operates flawlessly, open an additional browser window or tab. Log into your WordPress website as the administrator. Then, go to Customers > All Customers. From right here, you must see all the end users, with their respective roles, that are registered to your website.

Now, back to the incognito browser, let’s consider to log in utilizing the account we’ve just registered.
On effective login, the website must redirect you to the account web page. On the header, you must see the customized greeting and the ‘Log In’ hyperlink transformed to ‘Log Out.’

Wrapping It Up
You have just realized how to control consumer registration and logins with Breakdance. Hopefully, you have identified this beneficial.
If you want far more customizations to your website, examine out our manual on Working with Custom Post Types in Breakdance Builder. Right here, you will discover a whole lot about generating customized publish sorts to organize your articles greater.
If you have loved this walkthrough, do not overlook to share it with your network. Or if any of the methods over are not clear, allow us know in the feedback.