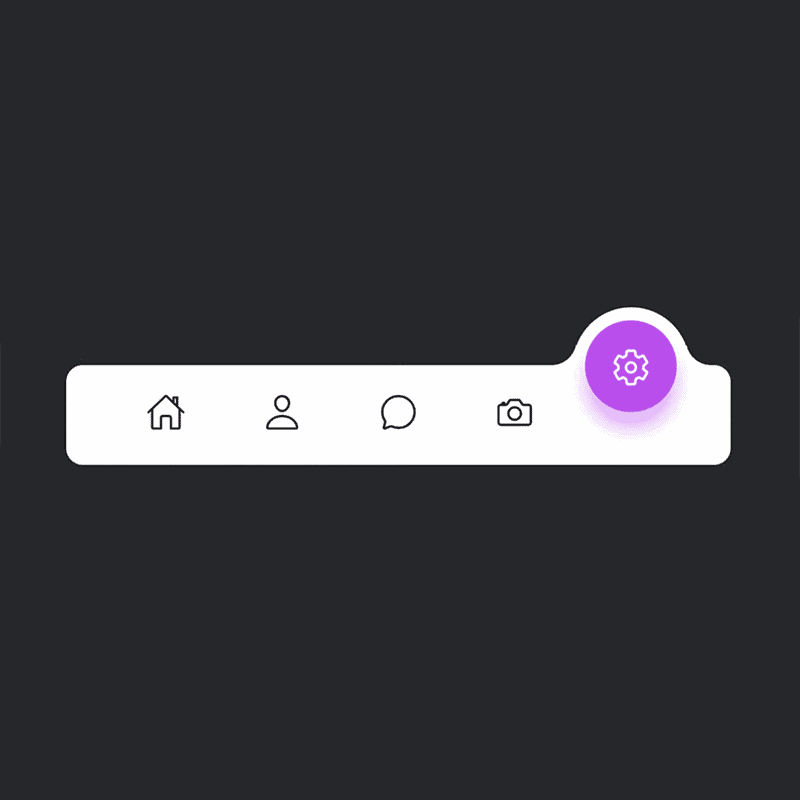
You can locate navigation bars on practically any internet site. But if you happen to be searching to stand out from the crowd, why not consider a curved magic navigation menu? It is eye-catching and elegant, excellent for including a minor pizzazz to your web site layout. With just a couple of effortless actions in Breakdance, you can have a expert-searching curved magic navigation menu that your site visitors will not quickly fail to remember.

In just a couple of minutes, we’ll go in excess of including the footer template, customizing your area and div factors, and including the customized code to show your footer. Let us go!
Producing a mobile-only Menu in Breakdance
The 1st stage is going to be including a new footer template to your web site. Make sure the settings are set to “all over the place” and preserve other settings as default. As soon as you happen to be in the editor, setup your construction pane with a area, div, and code block.


Set your area width to total & take away all padding (in spacing). This will stretch out the component so it will take up the total width of your display, permitting your mobile menu to increase across the bottom of a telephone display. Also, in the settings web page, you may want to hide the total area on all breakpoints that are not mobile. The menu bar isn’t going to make sense to have on a desktop (unless of course you tweak it to do so)


Incorporating Styling & Code
Your div is not going to have any distinct settings within of it except for a class. We’re going to use the div as a mother or father component to the code block which will have the menu within of it. In the innovative settings of your div, go to innovative and include a class referred to as navigation (.navigation). Click the minor pencil edit icon to open the selector settings. We have additional a class as it can be moved from component to component (if you wished to customize anything at all). Scroll down to Customized CSS and paste the following code within. This will set all of the layout and styling factors of our navigation bar. We’ll include the real bar and javascript in a minor bit.


/* This goes within the .navigation customized CSS box */

%%SELECTOR%% {
place: fixed
    bottom: 0px
width: a hundred%
height: 60px
background: #fff
show: flex
justify-content material: center
align-things: center
border-radius: 10px
}

%%SELECTOR%% ul
{
show: flex
width: a hundred%
  bottom:
}
%%SELECTOR%% ul li
{
listing-type: none
place: relative
/* 350 / five = 70 */
width: 70px
height: 60px
z-index: two
}
%%SELECTOR%% ul li a
{
place: relative
show: flex
justify-content material: center
align-things: center
flex-path: column
width: a hundred%
text-align: center
}
%%SELECTOR%% ul li a .icon
{
place: relative
show: block
line-height: 65px
font-dimension: one.5em
width: 55px
height: 55px
border-radius: 50%
transition: .5s
transition-delay: 0s
colour: #222327
}
%%SELECTOR%% ul li.lively a .icon
{
transform: translateY(-27px)
colour: #fff
transition-delay: .25s
background: var(--clr)
}
%%SELECTOR%% ul li a .icon::ahead of
{
content material: ''
place: absolute
prime: 10px
left:
width: a hundred%
height: a hundred%
transition: .5s
transition-delay: 0s
border-radius: 50%
background: var(--clr)
filter: blur(5px)
opacity:
}
%%SELECTOR%% ul li.lively a .icon::ahead of
{
transition-delay: .5s
opacity: .five
}

%%SELECTOR%% ul li:nth-youngster(one).lively ~ .indicator
{
transform: translateX(calc(67px * ))
}
%%SELECTOR%% ul li:nth-youngster(two).lively ~ .indicator
{
transform: translateX(calc(67px * one))
}
%%SELECTOR%% ul li:nth-youngster(three).lively ~ .indicator
{
transform: translateX(calc(67px * two))
}
%%SELECTOR%% ul li:nth-youngster(four).lively ~ .indicator
{
transform: translateX(calc(67px * three))
}
%%SELECTOR%% ul li:nth-youngster(five).lively ~ .indicator
{
transform: translateX(calc(67px * four))
}
Now time for the real bar! Go ahead and include a code block within the div and set the wrapper to a hundred% so the block expands across the total div. We’ll include HTML (in the PHP block) and JavaScript (in the JavaScript block). The HTML is going to include the menu bar physically to our web page as an unorganized listing (bulleted listing). With the styling we previously additional it will flip into the stunning menu bar. The JavaScript will present you which hyperlink is picked. You can have the menu bar both go to diverse spots across the identical web page or each and every button goes to entirely diverse pages
<ul>
<li class="listing lively">
<a href="#">
<span class="icon" type="--clr:#f44336">
<ion-icon title="residence-outline"></ion-icon>
</span>
</a>
</li>
<li class="listing">
<a href="#">
<span class="icon" type="--clr:#ffa117">
<ion-icon title="particular person-outline"></ion-icon>
</span>
</a>
</li>
<li class="listing">
<a href="#">
<span class="icon" type="--clr:#0fc70f">
<ion-icon title="chatbubble-outline"></ion-icon>
</span>
</a>
</li>
<li class="listing">
<a href="#">
<span class="icon" type="--clr:#2196f3">
<ion-icon title="camera-outline"></ion-icon>
</span>
</a>
</li>
<li class="listing">
<a href="#">
<span class="icon" type="--clr:#b145e9">
<ion-icon title="settings-outline"></ion-icon>
</span>
</a>
</li>
<div class="indicator"></div>
</ul>

<script kind="module" src="https://unpkg.com/[email protected]/dist/ionicons/ionicons.esm.js"></script>
<script nomodule src="https://unpkg.com/[email protected]/dist/ionicons/ionicons.js"></script>
const listing = document.querySelectorAll('.list')
perform activeLink(){
listing.forEach((item) =>
item.classList.take away('active'))
this.classList.include('active')
}
listing.forEach((item) =>
item.addEventListener('click',activeLink))
And which is it! Now you have a menu bar that seems to be fantastic, is animated, and seems to be superb across all mobile gadgets. Inside a couple of minutes you may be capable to appeal to a lot more site visitors and make your web page appear a lot more consumer-pleasant. Hope this tutorial aided and if you have any queries depart a comment under!