
Generating a dynamic testimonials area in your web site can improve your credibility and win more than possible buyers.
Feel about it: showcasing consumer experiences for a solution e-retailer, displaying pupil suggestions for an on the internet program, or sharing consumer stories for a consultancy. Every single offers a evidence of your output as a organization or skilled. But you will not want to copy and paste a area more than and more than once again. The suitable way is to produce these testimonials dynamically.
In this guidebook, I will stroll you by means of integrating dynamic testimonials in Breakdance with a couple of plugins. I guarantee, it ought to only get you a number of minutes to set up.

So, let’s get started out!
How to Develop Dynamic Testimonials in Breakdance
In this guidebook, let’s consider to create a customized publish sort to show testimonials on a webpage. Adhere to the actions beneath:
one) Set up CPT and ACF
Very first off, we’ll require added plugins to swiftly produce customized publish sorts.
CPT or Customized Publish Variety UI is a WordPress plugin that makes it possible for you to produce and deal with customized publish sorts and taxonomies for your web site.
ACF or Innovative Customized Fields is an additional sort of WordPress plugin that makes it possible for you to include customized fields for your publish sorts. This plugin will aid you later on on in displaying customized discipline values in your Breakdance template.
So, let’s set up and activate these two plugins. Navigate to Plugins > Include New and search for CPTUI and Innovative Customized Fields.


two) Develop a New Publish Variety
As soon as the plugins are activated, go ahead and include a new publish sort.
Go to CPT UI on the left side of your dashboard. Enter your publish sort slug, plural label, singular label. Then, click ‘Add Publish sort.’
In our illustration, we’ll identify our new publish sort ‘testimonial.’

As soon as you are accomplished, a ‘testimonials’ publish sort ought to seem on the left-hand side of your dashboard.

three) Develop New Fields
Following, we require to include customized fields for our testimonial publish sort. These customized fields will include the attributes of our publish sort.
On the left side of your dashboard, head more than to ACF. Click ‘Add New.’
Enter a discipline group title, discipline sort, discipline label, and discipline identify. To include an additional discipline group, hit ‘+ Include Discipline.’ Change the purchase by dragging.

For our testimonial webpage, I wished to show the user’s photograph, identify, firm place, testimony title, testimony specifics, star rating, and date. So, let’s produce a discipline for every single. Make confident to decide on the proper discipline sort for every single consumer information.

For the consumer photograph, use an picture discipline sort. For the star rating, use ‘Number.’ For the date, use ‘Date Picker.’ Do not fail to remember to set the date’s show and return format.

The rest of the fields can have a text sort.
As soon as you are accomplished including new fields, make confident to set the guidelines inside the Settings area. Publish sort ought to be equal to ‘testimonial,’ as proven.

Then, click ‘Save Adjustments.’
four) Include a New Testimonial
Let’s now include new testimonials for our internet site. On the left side of your dashboard, click the testimonials > Include New. This ought to open a blank webpage on your editor.
Go ahead and enter the title of the webpage. Right here, we can use the user’s identify as the title. Maintain in thoughts that you really don’t require to edit this on Breakdance.

Then, beneath the editor, you will see all the customized fields you have previously designed. Let’s upload the user’s photograph and enter some dummy information, as proven.

As soon as you are happy, click ‘Publish.’
Adhere to the exact same approach to include a lot more consumer testimonies.
five) Develop a Testimonial Template in Breakdance
Navigate to Breakdance > Templates. Click ‘Add Template’ and decide on ‘Add Customized Template.’
Then, enter the template title ‘Testimonials’ and set the place to Single/ testimonials. Click ‘Add Template.’

Edit your new testimonial template in Breakdance. Fashion it as you want.
Right here, I designed a column to show the user’s photograph, identify, and title. I also edited the font dimension, picture dimension, and spacing. To fashion the component, basically click it and modify its attributes proven on the left side of the editor.
Right here, we want to show the consumer data dynamically. Click the component and tap the small icon beside the label, as proven.

Inside the ACF area, decide on a ‘Testimonial detail’ you want to show. In this situation, we want to dynamically fetch the user’s photograph.

Then, I altered the user’s photograph to circle by setting the radius to 50%.

Now, do the exact same for the rest of the user’s data.

You can include a lot more components and dynamically fetch the rest of the user’s specifics. Include texts, icons, star rating, and date. Search them up on the left side menu and click to include. Change the dimension, layout, and shade as preferred.
You ought to attain a equivalent output like this:

As soon as you are happy, click ‘Save.’
six) Develop a Testimonial International Block
The objective of a worldwide block is to replicate a content material and use them anyplace on our internet site. In our situation, we’ll produce a testimonial worldwide block so we can repeatedly use them anyplace on our webpage. So, let’s go ahead and produce 1.
Navigate to Breakdance > International Blocks. Then, tap ‘Add International Block’ and enter a block title. Let’s identify it ‘Individual-Testimony.’
Edit your worldwide block in Breakdance. Right here, you can produce a customized layout or just copy the Breakdance template you have previously designed. Conserve the adjustments.
You ought to now have a worldwide block that appears equivalent beneath.

seven) Show Your Testimonials on Breakdance Webpage
Now you have the worldwide block for your testimonials, you can include it anyplace on your current webpage.
For this illustration, let’s consider to produce a new Breakdance webpage to show all our testimonials. Right here, I extra a new area and heading ‘What our customers say about us.’ But truly feel totally free to include any title you want.
Then, on the left-hand side, search for the ‘Post Loop Builder’ component. From the ‘Global Block’ dropdown menu, decide on the worldwide block you have just designed. In this guidebook, our worldwide block is ‘Individual-Testimony.’

On the side menu, go to Query > Customized > Edit Query. Set your ‘Source’ to ‘Post Types’ and ‘Include’ to the identify of your customized publish sort.

In this illustration, we picked ‘testimonials.’Edit the other fields as preferred. Then, finish with ‘Apply Query.’
eight) Edit the Fashion and Layout
Lastly, tweak the look of your testimonials area by adjusting the layout or including a background shade as you like. As soon as you are happy, click ‘Save.’

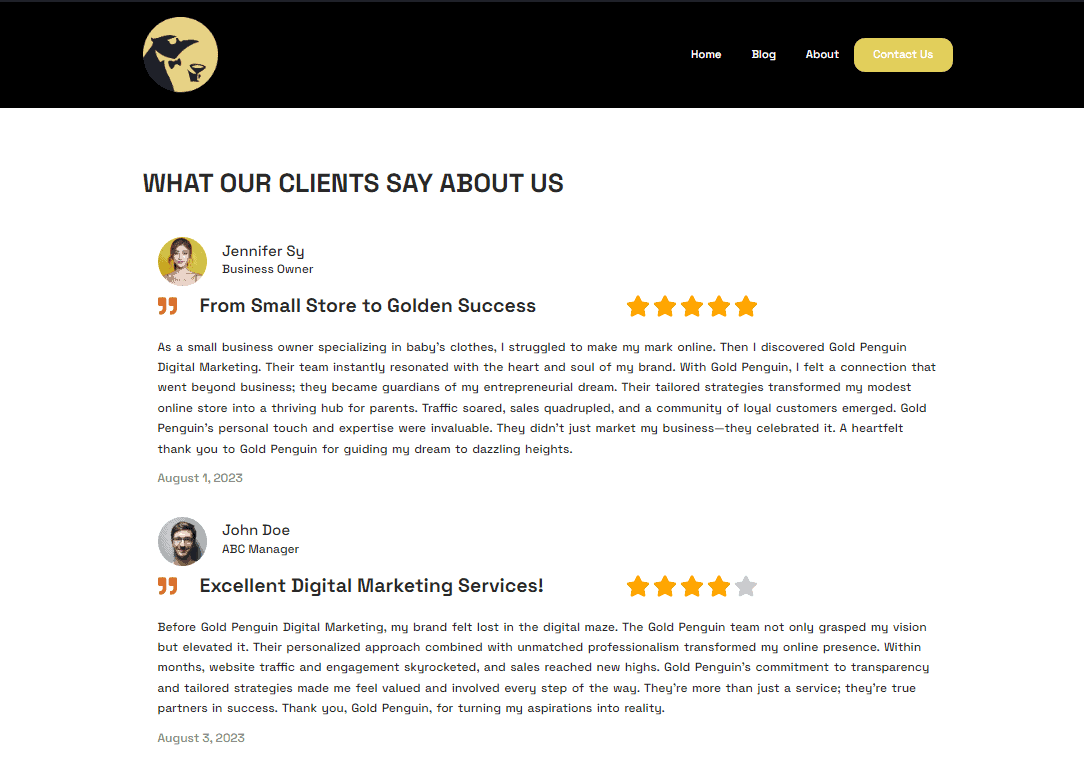
Here’s what our testimonials webpage appears like on our front-finish:

What’s Following?
That is a wrap!
Now that you have realized how to include testimonials in Breakdance, go ahead and investigate other plugins to increase your site’s consumer expertise.
If you are a organization, consider including a Google map into your webpage. Or use extensions like Components Hive to include some amazing animations on your webpage. Maintain tweaking even though you find out the other strong functions of Breakdance.
Received any inquiries? Depart your remarks beneath, and I will consider my greatest to response you as extensively as I can.